Boulder Hackerspace’s first ever video game tournament! (Super Smash Bros)

Last Weekend on November 15th 2014 the Boulder Hackerspace had its very first video game tournament. The games played were Super Smash Bros. Melee, Super Smash Bros. Project M and Super Smash Bros. for 3DS. There were 5 events in total, Melee singles, Melee doubles, Project M singles, Project M doubles and Smash 3DS singles.   Here are some pictures of the tournament as it was happening.Overview

Melee Friendlies

One fun thing about this particular series of games is that they are often played on old heavy CRT TVs instead of modern HDTVs. This is because Super Smash Bros Melee is such an old game that HDTVs lag compared to CRT tvs. The lag is only fractions of a second, but is noticeable and distracting when playing a fast-paced fighting game.

Project M and Melee Pools

All of the big CRT TVs you see in these pictures were brought to the Boulder Hackerspace by the participants just for this tournament. And here’s a video of grand finals for Project M singles

Project of the week: Estimating distance with SimpleCV

This week’s project-of-the-week comes in the form of a computer vision project by our member Brandon. He’s using SimpleCV on a Raspberry Pi to recognize a circle of a certain color, and then estimate distance to it based on comparing it’s known size to the size it sees with the camera. Brandon has posted some of his code at the bottom of the article, so be sure to look for that.

Pretty awesome Brandon!

[EDIT: it helps if I remember to add the link to his site!  🙂 ]

https://brskari.wordpress.com/2014/09/24/using-simplecv-to-estimate-distance-to-a-target/

Hacker Halloween Hootenanny, this Friday!

Don’t forget for Halloween this Friday, Solid State Depot is throwing a bash: the Hacker Halloween Hootenanny. Be sure to check out the Meetup and the event for details.

Project of the week: LED Motion bicycle tail light


This week’s project of the week comes from SSD hacker Rob B.  Not satisfied with any old red LED for his bike’s tail light, he decided to break out some addressable LED strip and add some animation to it. The code generates a sine wave function, and varies the duration and the wavelength to achieve the effect in the video. For the LED strip, he’s using the LPD-8806 type. The battery is a standard LiPO pack. The controller he’s using is a StripDriver v1 from one of our other hackers John E. StripDriver has been featured in several hacks around the space, and needs it’s own Project Of the Week, which will come soon.

Rob added that he wants to add a “Party mode” soon, that uses the full capabilities of the RGB LEDs on the strip, but the priority was safety, so red are the only LEDs that light up for the current version.

Project of The Week: Beetle-Kill Pine Door

Howdy Hackers!

Due to high rental costs in Boulder, my roommate and I decided to rent out the living room! It’s a pretty sweet living room, has it’s own separate entrance and a balcony. It made sense to us because the kitchen is the size of the living room with a balcony and entrance as well so we decided to efficiently use the area as a communal space/kitchen.We met an amazing couple and before moving in we all decided building a door to make the living room separate would be a fun project.

Thanks to the amazing Woodshop available to SSD members, this project came to life!

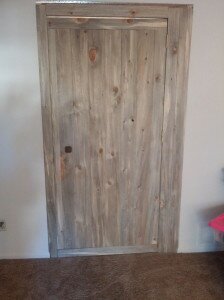
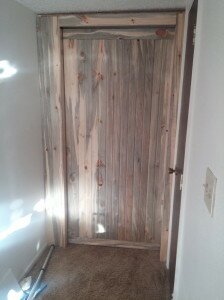
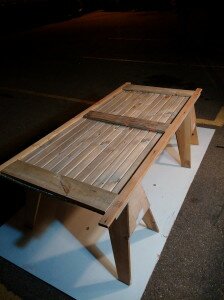
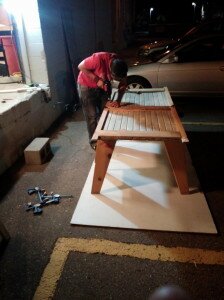
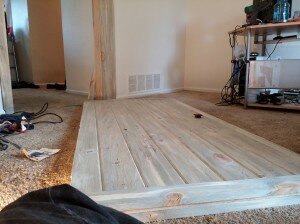
Behold the end result. An 80 pound door made out of beetle kill pine.

IMG_20141013_171451IMG_20141013_171309

We got all the wood at Home Depot for under $100 dollars. We figured if we’re going to have a door let’s go all out and make it legit and awesome, you know, something we could all be proud of- not some pre-made manufactured door.

IMG_20141011_133730

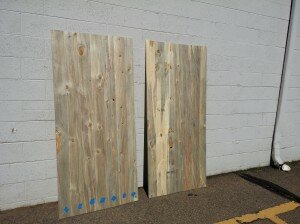
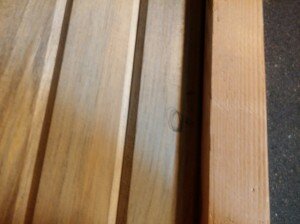
Home depot had these slatted boards that slide into each other, that made life a lot easier! But we still needed top and bottom trim and an internal support system.

IMG_20141011_225506IMG_20141011_225515

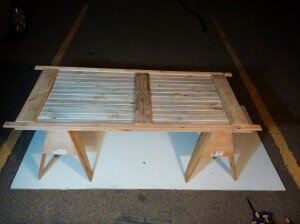
The internal support system turned out to be the most important aspect of the door and took a lot of measuring and planning. The slatted boards have a tendency to float away from each other so the width of the door kept expanding. Once we pushed them as tight together as possible we were able to get the correct measurements for the support system and tack the front and back panels together accordingly. We found some pallets and used the wood from that.

IMG_20141011_225729IMG_20141011_225718

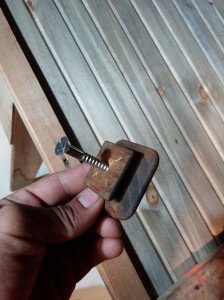
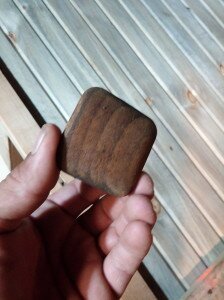
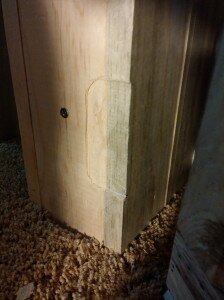
This is a solid knob that we got from Resource for 10cents!

IMG_20141011_225538

The circle is for where the knob was going to go. The middle support goes on top of that so the screw doesn’t go too far out the front of the door.


IMG_20141011_225906IMG_20141011_225936

The screw had to go through the middle support board and through the front panels. It turned out that the knob when screwed on as tight as possible was perfect! Meant to be I suppose=)

IMG_20141012_003628IMG_20141012_003037

After securing the knob The back panels were ready to go on. I used a pneumatic finishing nail gun (rented from home depot across the street) to secure the front and back panels to the internal support system. The reason we used finishing nails instead of Screws, bolts, or hammerable nails is simply because of aesthetics. Now from a few feet away it looks like the door is held together by magic;)

IMG_20141012_003706IMG_20141012_003620

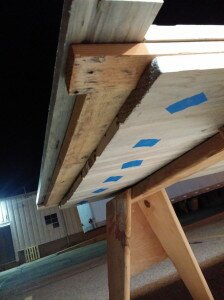
The top trim needed some support so I cheated the top and bottom support upward until it was halfway on the panels and halfway through the top trim. As you can see the top trim comes out a little bit, that was so I could put flat boards on the front. This way looks cleaner and the internal support system doesn’t show.

IMG_20141001_183637

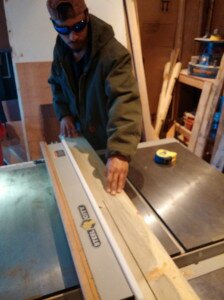
Just cutting the front trim as before mentioned.

IMG_20141012_154711

IMG_20141012_145419IMG_20141013_171244

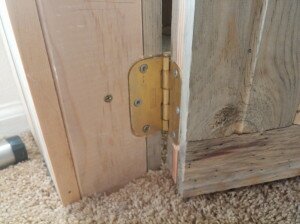
This part is incredibly important to get right or the entire project goes under. If the door drags along the carpet it could break the hinges so it’s important to line up where the hinges go correctly. To do this we put a scrap piece of board the same width as one of this boards (~3/4″) underneath the door and lined it up with the cut I made against the wall to use as reference. My roommate had a Dremel Multi-max oscillating tool which had a wood trim attachment, it is meant for precision cuts and that’s what I used, a router probably would have been good too.


The screws that came with the hinges were not even an inch long so we used 3″ long self tapping screws we got from McGuckins(cost like 4 bucks for 50 of them) We screwed those bad boys in and BAM! Door.

IMG_20141013_171451IMG_20141013_171309


Happy Hacking!


Cheers,

Bryant


Apple Press Night

Jennifer Farmer brought her home-made cider press to the space tonight, along with apples from her house!  Built with boards and plywood and an automotive jack, the rig cost less than $50. Fresh juice for all!!

 Smashing the apples with a 2×4

Getting the apples leveled

The apples weren’t quite perfectly leveled, so the jack is a little off center.

The juice pooled in the pan, then drained through a hole into a hose, and into the jug.

The gurgles were music to our ears!

Ta da!

Pouring nature’s spoils!

Come by and say hello at NoCo Maker Faire!

Come by our booth at NoCo Maker Faire, we’d love to chat!


Optical Probe – a tool for reverse engineering optical protocols.


From TV remote controls to high speed networking via laser fiber optics, optical communications is done every day. Because most of this information is carried on short pulses of either visible or invisible light, it is impossible to reverse engineer these signals without proper test equipment.

But, before you can reverse engineer anything, you have to know it exists.  A blinking light is obvious, but it could also be several pulses close together as several bursts of data. A dim light may be a dim light, or it could be a high speed pulse train that is fooling your eye into thinking it’s dim. Older telephone modems used to connect their “RX” LED to the data stream, and, because it faithfully reproduced the data optically, you could eavesdrop on the communication from across the street.
Once you know you have a signal of interest, test equipment allows you to sample it ways that exceed your senses. Humans can’t see infrared yet. Sure, there are experiments to see if the eye can become sensitive to infrared by substituting one type of vitamin A for another, but that’s a bit extreme just to see if your remote is working, isn’t it?  Equipment, from night vision scopes to cell phone cameras can all detect invisible light, but they are not fast enough to analyze the data contained in their pulse trains. Amplitude, frequency, and other characteristics need a more advanced probe — this probe.
I designed this probe when working with a power meter reader. It output a dim IR light (that was a pulse train) to a meter and the meter would respond back with … something. I didn’t know what, it just looked like a blink of light.
The circuit for viewing those light pulses is easy. An oscilloscope can only sample voltage over time, so we need to give it the ability to sample light. A phototransistor (Q1) will modulate electrical current flow based on how much light strikes it, but an oscilloscope measures voltage, not current.  We add a power source (B1) and resistor (R1) into the circuit: according to Ohm’s law, the voltage across the resistor will be proportional to the current through R1, which is the same current that flow through Q1. Varying the resistor’s value adjusts the gain of the circuit. Because the phototransistor is sensitive to infrared light that we can’t see, it would be helpful to add a visible LED (D1) and a transistor to drive it (Q2) to give us a bit of visual feedback. This enables us to use the optical probe to check if there are signals present without the need of the oscilloscope. Of course it won’t see the pulses you’d see on an oscilloscope, but it will work well as a remote checker.

Don’t forget! NoCo Mini MakerFaire is this weekend, Oct. 4th and 5th

SSD will be there, you can count on it!  Make sure you look for our booth and stop by!

http://makerfairenoco.com/

Starting up the “project of the week” again

Wow, it’s been a while since the blog has been updated with a member project. However, I know for a fact that our members are always busy with projects: we talk about them every Tuesday night! So in the spirit of Do-ocracy, I’ve started pestering my fellow hackers to get me information on their projects, so we can post them here. For a quick list of examples, we have members working on projects like:

  • power monitoring solutions for the home (several members building their own systems)
  • some of those power monitoring solutions extend into home automation
  • a solar powered base station to extend networking beyond a foothill to his house in the next valley
  • reverse-engineering an RC car’s protocol http://brskari.wordpress.com/2014/06/02/turn-your-raspberry-pi-into-a-radio-controller-for-rc-vehicles/
  • ultra high resolution microphotos: http://boingboing.net/2014/07/03/mosaic-photography.html
  • an LED video screen on a wearable shirt
  • art projects for Apogea and Burning Man art festivals
  • an LED augmented motion sensitive umbrella
  • a cargo bike
  • hand crafted teardrop trailer

In addition to these individual projects, we also have ongoing work on the hackerspace itself.

  • we’ve obtained four Lulzbot printers from their production line retrofit. This is where hackerspaces were given the option to buy their phased out equipment for cheap. A couple of our members have taken on the task of getting them up and running and at home in what was our admin office.
  • some members working on an aquaponics setup, including one at the space

As we get back to project of the week, we will feature these projects and more. Stay tuned…

CRM